
Why the Evolis Zenius is the Ideal Card Printing Machine for On-Site, On-Demand ID Cards
When it comes to printing professional cards on-site, whether it's for staff IDs, visitor passes, membership cards, or secure access badges. You need a card printing machine that is fast, flexible, and reliable. The Evolis Zenius delivers exactly that.
At Card Monster, we’ve helped countless businesses across South Africa set up their Zenius printers for quick, consistent card printing without hassle. If you're printing cards regularly. Maybe weekly for new employees, or daily at reception for visitors, this card printing machine will quickly become a vital part of your operations.
What Is the Evolis Zenius?

The Evolis Zenius is a compact, single-sided direct-to-card printer designed for low- to medium-volume printing needs. It prints cards one by one or in small batches, offering vibrant, full-colour prints in under 30 seconds per card. It’s USB-compatible, with optional Ethernet and encoder modules, and fits neatly on any reception desk, front office, or small back office.
The Evolis Zenius card printer comes in two versions: Classic and Expert. The main difference lies in connectivity and upgrade options, especially when it comes to encoding features.
Here’s a breakdown of how the two models compare:
🔹 Evolis Zenius Classic
Key Features:
-
USB-only connectivity
-
No encoder options (cannot encode magnetic stripes or smart cards)
-
Fixed configuration – cannot be upgraded later
-
Lower upfront cost
Best For:
-
Businesses needing basic, single-sided colour card printing
-
Users who don’t require smart card integration or network connectivity
-
Startups, schools, or small offices printing low volumes without encoding needs
Limitations:
-
Cannot add an Ethernet connection or encoding modules later
-
Not suitable for cards requiring contactless or magnetic encoding (e.g., access control or time & attendance)
🔸 Evolis Zenius Expert
Key Features:
-
USB and Ethernet connectivity
-
Upgradeable with:
-
Magnetic stripe encoder
-
Contact smart card encoder
-
Contactless (RFID) encoder (MIFARE®, DESFire®, etc.)
-
-
Same print quality and speed as the Classic model
-
Ideal for integration into networked office environments
Best For:
-
SMEs and larger businesses that:
-
Use cards for access control, time tracking, payments, or data storage
-
Need to print from multiple workstations over a network
-
Want future-proofing through optional upgrades
-
Advantages:
-
More versatile
-
Easily integrates with badge systems, POS, and HR software
-
Can scale with your business needs
Which Should You Choose?

-
Choose Zenius Classic if:
-
You only need basic ID cards, gift cards, or photo passes
-
You’re on a tight budget and won’t need encoding later
-
You plan to operate it from a single PC via USB
-
-
Choose Zenius Expert if:
-
You need encoding (now or in the future)
-
You want to connect the printer over a network
-
You need flexibility to scale your card program
-
Need help deciding? At Card Monster, we offer both versions and can help you choose based on your current needs and future goals. We also stock all High Trust ribbons, cleaning kits, and encoder add-ons compatible with the Zenius Expert model.
Why Is the Evolis Zenius a Must-Have for On-Site Printing?
1. You Need to Print Frequently (But Not Thousands Per Week)
The Zenius prints up to 150 full-colour cards per hour, making it the perfect fit for:
-
Weekly staff ID reprints
-
Daily visitor cards
-
Monthly access card rollouts
-
Ad hoc loyalty or gift card runs
It’s ideal for organisations printing between 300 and 15,000 cards per year, where outsourcing printing would be too slow or too expensive.
2. On-Demand Personalisation for Each Person
With Zenius, you can personalise each card as it's needed—including names, photos, barcodes, and roles. This makes it especially useful for:
-
Reception desks (print visitor cards with their names on the spot)
-
Security offices (issue cards that grant limited access per department)
-
Gyms and clubs (personalise member cards with expiry dates or QR codes)
You can even link your designs to a database, so your receptionist can click and print without manually typing details each time.
Step by Step Evolis Zenius Set Up
Step 1: Powering on the Zenius Card printer & Installation of software
Click here to watch: Evolis Zenius | Installation
-
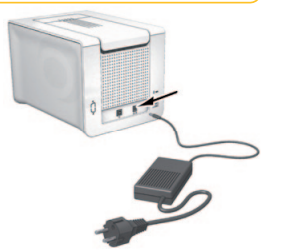
Connect the power cable: Plug the power cable into the power supply and then into the printer itself.
-
Plug into a power socket: Connect the other end of the power cable into an earthed power socket.
-
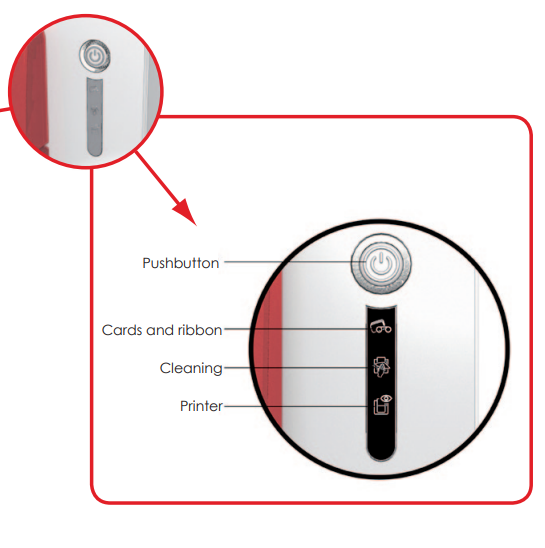
Turn the card printer on with the power button: wait for the white light to stop flashing.
-
Download the software online or with the CD given: Download the software here: https://myplace.evolis.com/s/product/zenius/01t5p00000CXScQAAX?language=en_US&tabset-100fe=2. Make sure to select the software that will be compatible with your computer. I.e. If you have a Dell Laptop, use the Windows Software exe download.
-
Wait for the software to download: make sure you click download, accept the terms and conditions and follow the prompts.
Step 2: Connecting your USB to the Zenius Card Printer
-
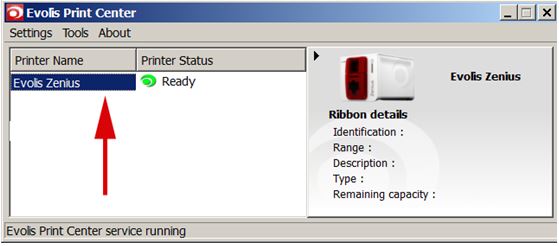
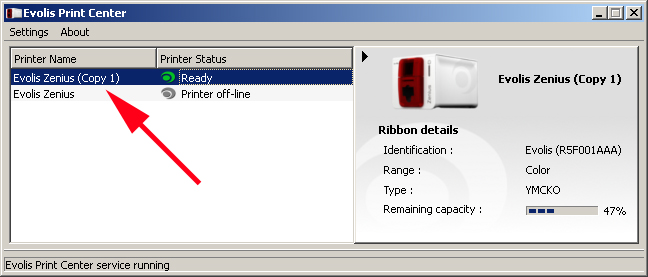
Wait for the prompt to connect your printer with Ethernet or USB while installing the card printer: Connect the USB to the back of the card printer. Select continue and finish the installation process. The Evolis Print Centre will load on your desktop and immediately pop up on your browser.

-
The card printer will state no printer ribbon available. But the Zenius printer will pop up saying ready.
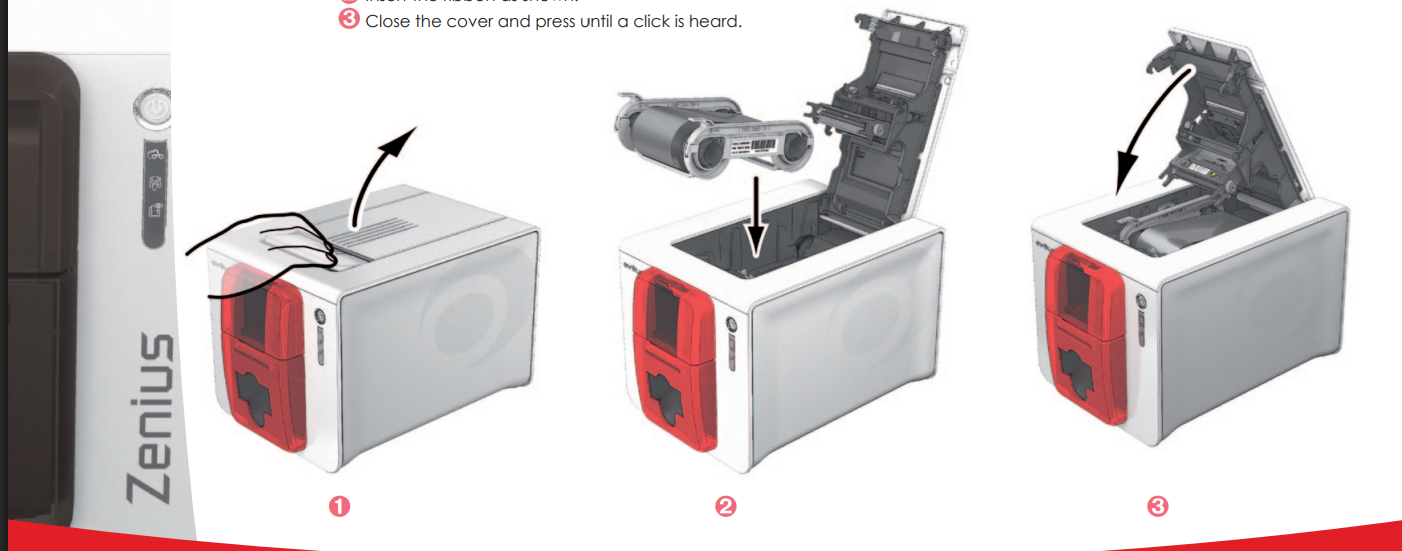
Step 3: Load your Card Printer Ribbon
-
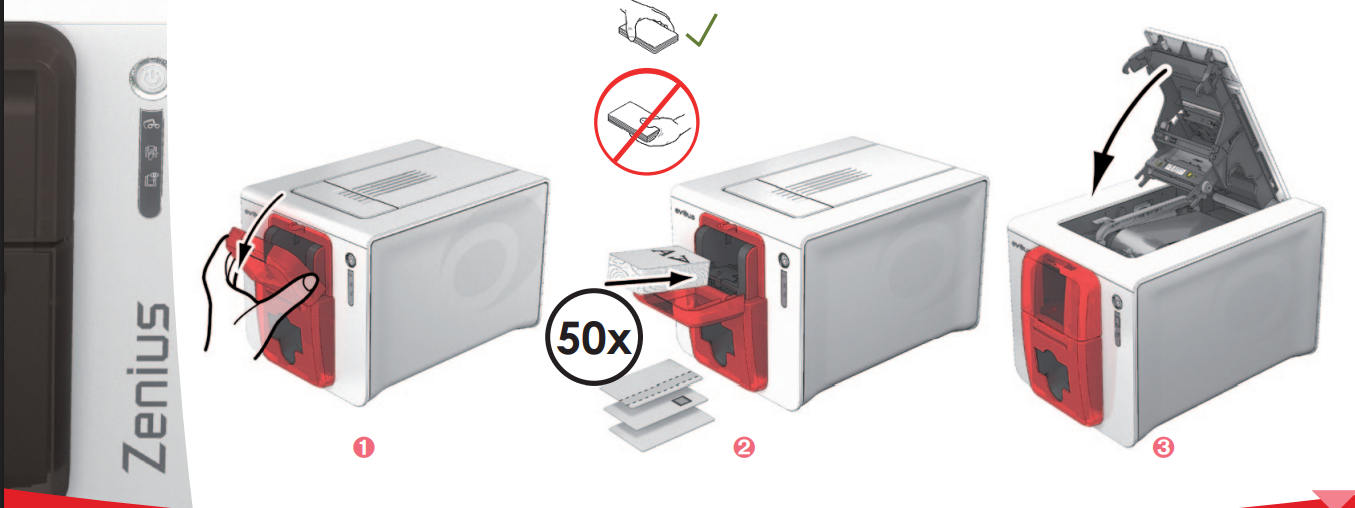
Open the printer cover and place the ribbon inside: place the ribbon with the ribbon spikes facing towards you.
-
Adjust the gauge: Adjust the gauge level to 30 mil or 0.76mm thickness (thickness of the CR80 Card) before printing.

-
Close the printer cover: Make sure to close the printer cover to begin printing.
-
Your printer centre will say that the printer ribbon is now loaded and give you the description of how many prints are left. Status will let you know when the printer ribbon supply is running low, and for you to replace it. It will say YMCKO ribbon for colour ribbon and K ribbon for monochrome.
Step 4: Load Cards into the Input Hopper
-
Open the card feeder: Insert the cards, a maximum of 50 cards of thickness 0.76 mm. Ensure the cards are positioned as illustrated in the diagram.
-
Close the card feeder
Step 4: Card Design and link to Database
-
Design your cards using CardPresso Software. Depending on what features you need will depend on what version you need. The CardPresso XXS Lite version is for card design and printing for up to 50 employees or cards. There are templates you can use, signature acquisition, internal database and barcodes 1D, WIA/TWAIN and DirectShow acquisition as well as magnetic encoding. If you’d like more capabilities, you can upgrade to the CardPresso XM or XL version where you are able to upload photos to the design as well as connect to a database with all your employees' information (name, employee ID number, etc). As well as 2D barcodes with unique numbers that they can scan on-site.
-
Design your cards using Canva. This has limited capabilities with issuing photos as you have to manually add them, but is relatively inexpensive if you have someone who is willing to spend the time creating cards for you and bulk creating it on Canva. Please watch this video to see how to link your databases to the design on Canva. You will need the pro version for this, and that does cost $19.99 per month. Here is our step-by-step process of linking your database to your Canva design: https://www.youtube.com/watch?v=D2BdT4U7ZIM&t=2s
Bulk Create Unique Cards with Variable Data Printing #canvadesigner #idcards #cardcreation
Step 5: Print your cards
-
Once you have your design, you can now print your cards.
-
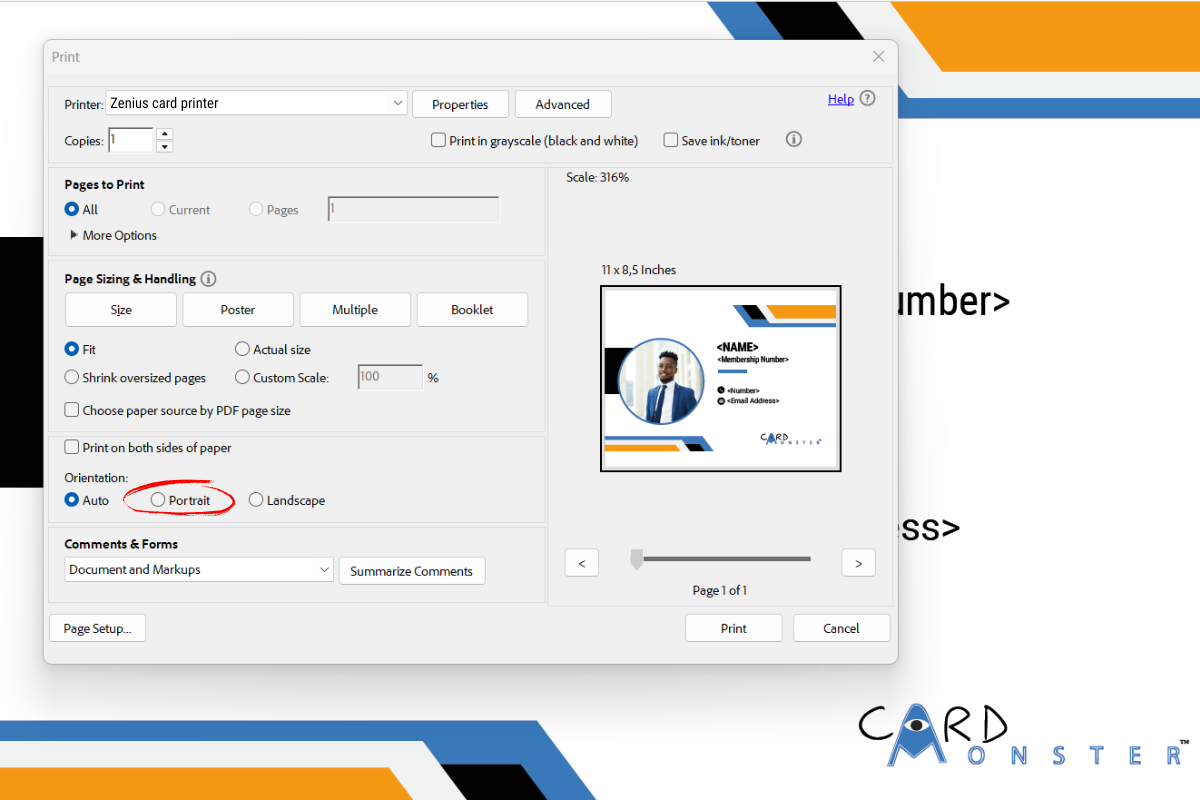
On your design (either will be a PDF or from the CardPresso Software) select print.
-
Make sure you select the correct printer: Zenius card printer.

-
Select orientation as being portrait.
-
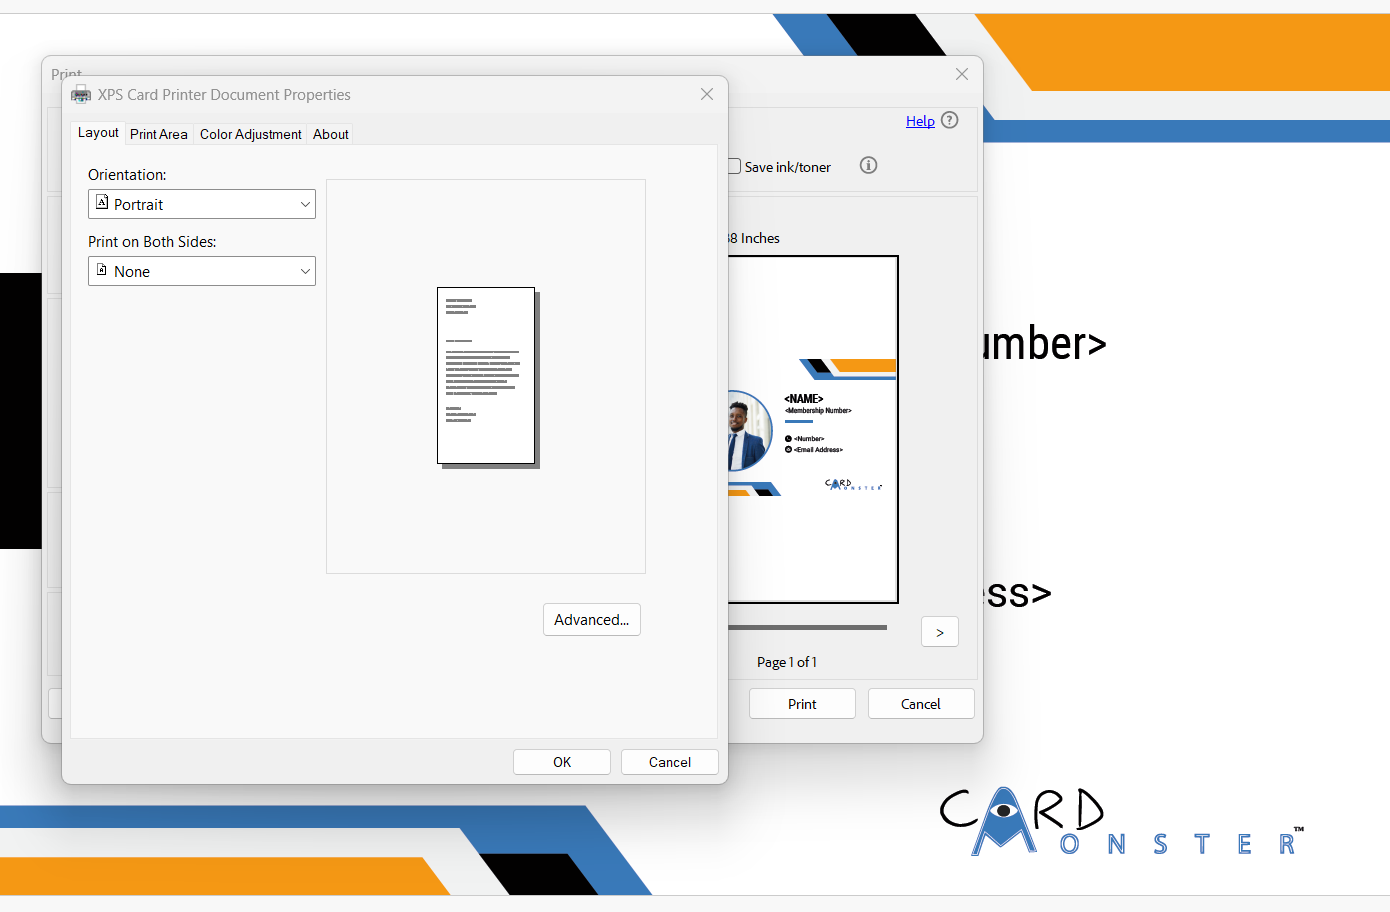
Select properties on the right-hand corner and select orientation to be portrait as well.
-
Click okay and select print.
-
The card printer will start printing, and your cards will be printed beautifully.
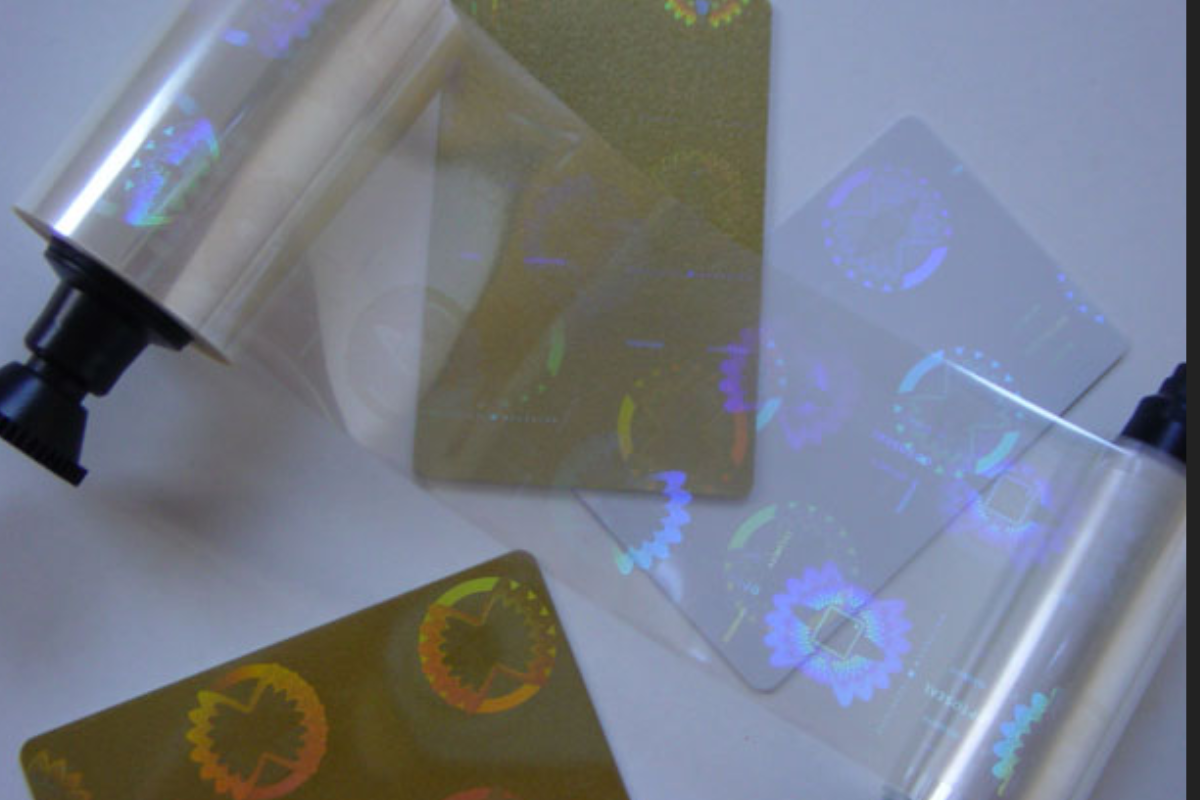
Step 6: How to print the holographic layer over my printed card?
-
Remove the colour ribbon from your card printer: open the printer cover and remove the colour ribbon.
-
Place the holographic ribbon in the card printer: place the hologram ribbon in with the spikes facing out, and close the printer cover.
-
Open the Evolis Print Centre: Double click on the printer. The ribbon would have changed to a hologram ribbon and state the status of how many prints are left (there are 400 prints on the hologram ribbon).
-
Double click on the Zenius Card printer in Evolis Print Centre: Select the printing dropdown and click on ribbon.

-
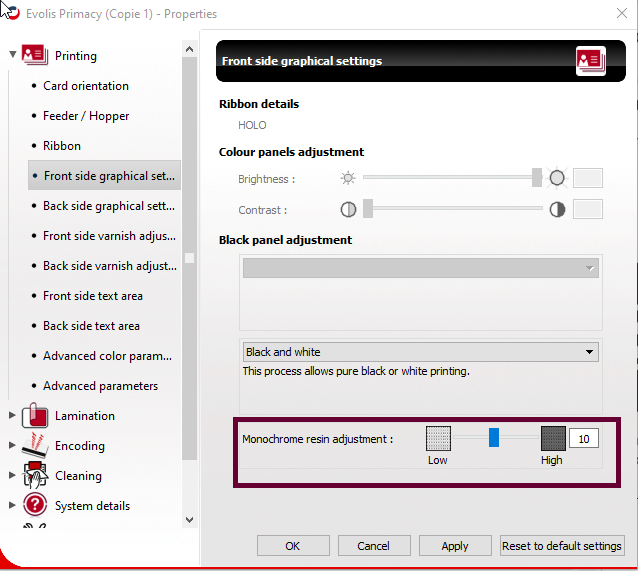
Manually select ribbon: select the ribbon type dropdown. Make sure to scroll down to the last option called HOLO (This will ensure that the hologram ribbon is selected).
-
On the left-hand panel select front side graphical settings: You can adjust the printing density if needed, on the Front/Back side graphical settings here. You can adjust the intensity of the holographic ribbon by increasing the resin adjustment number. This just enhances the visibility of the hologram, but it does not need to be adjusted.
-
Make sure to click APPLY and OK.
-
Repeat Step 5 to print the holographic overlay on your card.
-
Make sure to change the ribbon back to YMCKO when you are done with the holographic overlay. Repeat step 6, but make sure to change the ribbon type dropdown to colour ribbon.
Optional Add-Ons That Make the Zenius Even More Powerful
Remember, you cannot upgrade with the Evolis Zenius Classic card printer, only the Evolis Zenius Expert.
-
Smart Card Encoder (MIFARE®, DESFire®)
– Ideal for access control or contactless time & attendance systems. -
Magnetic Stripe Encoder
– For room access or retail point-of-sale integration. -
Ethernet Upgrade
– Perfect for network printing from multiple workstations. -
Cleaning Kits & Hologram Ribbons
– Available directly from Card Monster.
Why Buy Zenius From Card Monster?
✅ South African support and setup guidance.
✅ Access to CardPresso software XXS for free and templates. You are able to upgrade to the next version if you need more capabilities and features. We are able to quote you on the next version.
✅ Hologram and ribbon stock on hand or within a week.
✅ WhatsApp support, technical advice, and training are available.
✅ Bundled starter kits to get you printing immediately.
We also offer remote setup assistance at a fee of R850.00 for training, and 7-14 business day delivery on consumables.
Final Thoughts: Should You Invest in the Evolis Zenius?

If your business relies on speed, reliability, and professionalism when printing ID cards or customer passes, the Zenius is the best mid-range card printing machine on the market.
It’s compact, easy to use, affordable to maintain, and extremely versatile. Whether you're printing 10 cards per week or 100 per day, this is the model that consistently delivers.
Need Help Choosing?
If you're still unsure which Evolis printer is right for you, don't hesitate to reach out to Card Monster. Our team of experts can help you assess your needs and recommend the perfect solution for your business.
Leave a comment